If you’ve ever had the chance to experience a sushi chef chopping, slicing, and filleting fish and then rolling sushi like it’s nothing, you understand what an impressive art form it is. It takes 10 years or more of rigorous training to become a master sushi chef, also known as an itamae. This is a highly-revered profession in Japan, and only those deemed good enough rise through the ranks and go on to become a sushi master. So it’s no wonder it can be a little intimidating….okay, very intimidating…to attempt to make sushi at home, especially if you have never made it before. And while you may never study or practice sushi making with the seriousness of a master sushi chef, with a little practice, you can go from beginning sushi maker to a sushi-making expert.
Sushi is becoming an increasingly-popular type of food and is a $22 billion industry. However, with increased awareness of nutritional intake (one sushi roll of six to nine pieces can contain as much as five hundred calories), more people are opting for homemade versus restaurant sushi. Not only can you monitor the nutritional value of the ingredients you use, but making it at home saves you money and it is fun. Before we dive into a beginner’s guide to making sushi, let’s talk about what sushi is and where it comes from.
History of Sushi
Many people mistakenly think sushi is just raw fish. In fact, sushi is a mixture of raw fish with fermented short-grain rice. Originating in southeast Asia, sushi is a way to prolong the shelf life of fish. When fish were placed into fermenting rice, it was discovered that the fish were preserved by a pickling process brought about by lactic acid bacilli that were released as the cooked rice fermented, which in turn interacted with the salt and pickled the fish. Over time, vinegar was added to prolong the freshness of the fish, and the rice was thrown out. Then it was discovered that the fermented rice actually gave the fish a good flavor, and they started eating the fish wrapped in the fermented vinegar rice. The rice is the key to good sushi!
Step One: Decide what type of sushi to make
The first step to making sushi is to decide what type of sushi you want to make. Some of the most popular include:
Nigiri – One of the most-common forms of sushi, this is made of fresh fish or seafood served on top of hand-formed sushi rice.
Maki – Fish encircled by rice and surrounded by seaweed (nori).
Uramaki – Fish wrapped in seaweed with rice on the outside, or inside-out rolls.
Temaki – Hand-rolled sushi in cone shapes, wrapped in seaweed. This is an excellent choice for newcomers to sushi.
Sashimi—Raw fish or seafood served alone without rice or seaweed. The meat is typically high quality and thin sliced. This can be served with sauces.
Nori – Rice and other ingredients, such as fish, wrapped in seaweed (nori).
Newcomers to sushi may feel a little uncomfortable eating raw fish, so trying something that contains cooked fish may be more appealing. A beginner’s favorite is the California roll, which contains cooked imitation crab meat, cucumber, and avocado. This may also be the easiest one to create as you learn to make sushi.
Now that you know what types of sushi there are, let’s learn how to make it.
Step Two: Gather Your Equipment
Next, you need to gather your equipment. You don’t have to high high-end or fancy equipment to make sushi. Most of these items can probably be found in your kitchen cabinets. Here are the basics you need to get started:
Rice cooker, instant pot, slow cooker, or a soup pot – Use something that does not let steam escape.
Sushi-grade knives, such as a Yanagi ba (willow-shaped) knife, which is the standard sashimi knife. It is also good for cutting sushi rolls. You can also use a Santoku, which is good for cutting fish, meat, and vegetables. A regular kitchen knife is not suitable for cutting through the sushi roll and may destroy the nori wrap. You want a high-quality knife that will last.
Fish knife – The Deba knife is a more traditional Japanese knife that is used for butchery and fileting. You can use a meat cleaver in place of a Deba.
Vegetable knife – The Nakiri knife is a double-edged knife with a straight blade that is perfect for cutting vegetables
Rolling mat
Large bowl
Rice paddle or wooden spoon
Small bowls and plates
Cutting board
Colander or bowl
Dish cloths
Step Three: Cook the Rice
The rice is what makes the sushi and is potentially the most important part of the process. You want to follow the directions closely. You’ll need:
Sushi rice – 2 cups of Japanese rice (Use short-grain rice because it has the right amount of starch to make it sticky)
Water – 2 cups of water
Rice vinegar – 3 to 5 tablespoons of Japanese rice vinegar
Sugar – 2 to 3 tablespoons of sugar
Salt – 1 to 2 teaspoons of salt
Start by rinsing the rice with water to remove excess starch, and then drain it. Continue to do this until the water is clear. Next, add the rice and water to the pot, cover and bring to a boil. Reduce the heat to low and simmer for 20 minutes or until the water is absorbed and the rice is tender. Transfer it to a large bowl, and let it stand for 10 minutes.
While the rice is cooling, heat the rice vinegar until hot but not boiling. Add the sugar and salt and stir until the sugar is melted. Let this cool, and then pour it over the rice. With a wooden paddle or spoon, stir the rice, making sure to coat it evenly. The rice needs to cool completely before you start making sushi. You can fan the rice to help it cool, or you can spread it out on a baking sheet. Do not use any aluminum as it will react to the vinegar. Cover it with a damp cloth to keep it moist while you prepare your filling.
Step Four: Create and roll the Sushi
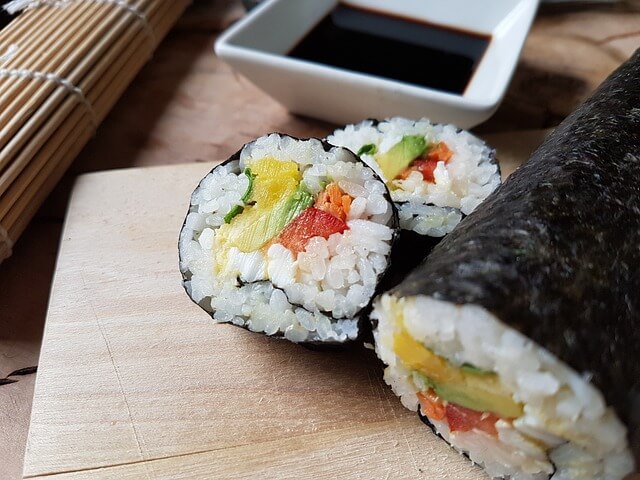
Because it is the most popular type of sushi and appears to be easy to tackle for a beginning sushi maker, your first attempt should be to make a nori roll, also known as maki-zushi, such as a California Roll.
You will need:
Cucumber
Avocado
Crab Meat (imitation)
Nori sheet
First, place a sushi mat on a surface so that the mat rolls away from you. Place the nori sheet shiny side down on the rolling mat. Moisten your hands with water (this helps when handling sticky rice). Spread half a cup of sushi rice over the nori sheet, leaving one inch at the top.
Arrange your sushi roll fillings (avocado, cucumber, and imitation crab meat) in a narrow row across the top third of the sushi rice, leaving a space of rice above and below the strip of toppings.
Moisten the top edge of the exposed nori with water. Take the rolling mat and using both hands, fold the closest edge of the nori sheet so it overlaps the sushi rice and fillings.
Roll tightly with firm pressure using the rolling mat. Roll starting with the edge closest to you and then roll until you reach the rice-free edge at the far end of the nori. Overlap the moist edge of the nori sheet to create a seal.
Use the rolling mat to shape the sushi roll by pressing along the tops and sides of the roll. Remove the roll from the mat and place it seam-side down on a cutting board.
Moisten a knife in water/vinegar and cut the nori roll into six or eight pieces. Serve on small plates and enjoy!
Costs to Make Sushi
As stated earlier, making sushi at home is less expensive than eating sushi in a restaurant. Restaurant sushi can cost up to $18.00 a roll. Ready-made sushi at the grocery store costs between $7.00 and $9.00 per roll on average. And homemade sushi costs about $24.00 for eight California rolls, or about $3.00 each. It’s definitely worth the money saved to make it at home, and you get to have fun in the process.
Scale of Difficulty
As far as difficulty, making sushi is not that hard. The most difficult part is getting the rice right, and rolling it tight enough while only using gentle pressure is the next most challenging task. It really is something that requires time and practice to become well skilled.
A Few Helpful Tips
If your sushi is not sticking, you may have used too much water for rinsing or while cooking, too much heat when cooking, or cooking it too long or too fast.
If your sushi roll is falling apart, it is usually due to being overstuffed. Use a smaller amount of rice, and this should solve the problem. It may also require a tighter rolling process.
You can master sushi making like a real sushi chef. As with any attempt at cooking something new, it takes practice. Make mistakes and learn from them. The more you make sushi, the more chances you have to improve, and then you can expand the types of sushi you create. And in 10 years or more, you, too, can be an expert sushi chef.