Pickled ginger is much more than a condiment that goes down well with sashimi or sushi. Some off-label uses of pickled ginger include its application in marinating meat, as a salad dressing, and in sandwiches. Learning how to create this magic condiment at home will save you some money.
To make great tasting pickled ginger, you’ll need fresh, young ginger, rice vinegar, organic sugar, kosher salt, and water. Wash the ginger, then cut into thin slices. Sterilize the containers you’ll be using, and finally, soak your ginger in the briny solution. Let it stand for a couple of days.
In this article, we share an easy pickled ginger recipe that anyone can use to make some fantastic Gari at home. You’ll also get to learn:
- The origin of pickled ginger
- What exactly is pickling
- The benefits of pickled ginger
- Different ways to enjoy your Gari
The Origin of Pickled Ginger
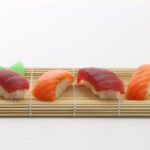
Shin-shoga no Amazu-zuke or Gari, as the Japanese refer to it, add a lot of zest to Asian dishes in Vietnam, Thailand, and Malaysia. Traditionally, Gari is taken between different sushi types to cleanse the taste buds.
It is also an amazing accompaniment to the Chinese delicacy, Century Eggs. If you have not tried pickled ginger, then you are missing an exemplary culinary delight. Pickling ginger significantly alters its taste. Gari is perfect for that person that loves ginger’s kick in food but more mellow notes.
Japanese sushi ginger is both sour and sweet and has a little spiciness to the main dish. Store-bought Gari is not only hard to come by but can be costly. It also does not taste nearly as good as its homemade counterpart. Commercial sushi ginger lacks the homemade pickled ginger’s characteristic, bright personality, and flavor.
Pickling ginger is surprisingly easy. Learning how to create this magic condiment at home will save you some money, the hassle, and time that you would otherwise spend chasing down expensive jars of Gari.
What Is Pickling?
When spring springs, every chef at heart knows that it is pickling time. Pickled foods get along well with a variety of dishes. You can have your pickled veggies inside a taco, on a burger, or atop a salad.
These condiments round off a meal, giving it a fantastic texture and briny bite that, over time, becomes an addiction. This is the reason the art of pickling is a culinary art that has a global following.
Visit any international food festival or tour, and you will find an array of pickled bites to please any taste bud. From Korean kimchi, Indian chutneys, Mexican salsas to New York City’s best kosher cucumber pickles. The Scandinavians love their pickled herring while the Irish adore their corned beef. In the US south, pickled pig’s feet are a rare delicacy.
Foods will pickle if you soak them in solutions that prevent spoilage. You can preserve your foods in strong acids, such as vinegar, to inhibit any bacterial growth on them. This is the easiest method of making kosher cucumber and sushi ginger.
You can also allow your foods to ferment by soaking them in salt brine. Fermentation encourages the growth of bacteria. ‘Good’ bacteria hinder food spoilage. Fermentation produces pickled foods such as kimchi and cucumber dill pickles.
Humanity has pickled food for centuries to preserve it for winter, drought, or travel. Pickling does not only preserve food but enhances its texture and taste. The evolution of pickling has put an indelible stamp on some cultural food inclinations.
Southeast Asia cuisine, for instance, has sour and spicy notes. Eastern European flavors are predominantly acidic. You can refer to pickling as a form of decay but in a controllable format since it slows down food decay.
Choose Fresh Ginger for the Pickling Process
The traditional Japanese sushi ginger comes from young ginger shoots. The Chinese refer to tender spring ginger or baby ginger as Zi Jiang in Mandarin. Spring ginger has some pink blush to it, and unlike mature thick-skinned ginger, it is neither fibrous nor spicy.
The fledgling ginger shoots are less spicy and juicier than ginger in full bloom. Young ginger has nearly translucent skin. It is also easy to scrape off with a scrub. Alternatively, you can leave it on while pickling to give your Gari a beautiful pink blush.
When choosing the perfect ginger for your pickling needs, choose young ginger because it absorbs the flavor of vinegar better than mature ginger does. While mature ginger takes close to five days to pick up the sour and sweet pickling flavor, budding ginger only needs a night to do so.
Unfortunately, young ginger can be a rare find in a regular store. A visit to the farmer’s or Asian markets should supply you with the fresh fledgling ginger with pink tips. Young ginger is easy to slice, and it will look creamy when you slice it. Besides its soft skin, spring ginger has some green color in its roots. Avoid mushy, wrinkly, and moldy ginger.
What if There Is No Young Ginger?
If there is no spring ginger in your neck of the woods, use old ginger in its stead. Choose the ginger rhizomes with small knobs since they will be less fibrous. Their color will also stay a fresh yellow after processing.
Before slicing into old ginger, taste the rhizomes first. Choose the mildest and juicy of old ginger knobs for your pickling process.
Simply scrape off a tiny bit of the rhizome using your fingernail for tasting. You will need to peel old ginger before pickling since its skin is too fibrous and tough.
If your ginger is too tart, soak it in boiling water for a minute or two. Repeat this process at least four times and change your just-boiled water in between the soakings. Some people toast their old ginger for a few minutes before pickling to cut down on its harshness.
Remember that the more mature the rhizome is, the fierier and tough it will be. Some slight cooking will soften and temper some of its harshnesses. Alternatively, toss you mature ginger in kosher salt first. Leave it in the salt for half an hour to soften its fibers and to tame its heat.
Prepare Your Ginger for Pickling
Before you can embark on the pickling process, you need to clean and slice your ginger. So, take a handful of your young ginger rhizomes and rinse away any trace of dirt using water. If you prefer your Gari without its skin on, scrub it off using a teaspoon.
You can alternatively peel the skin off with a vegetable peeler. When peeling, avoid cutting into the ginger as much as possible. Next, you need to turn your ginger shoots into attractive thin slices.
While a sharp knife can slice your fresh ginger, a mandoline does a better job of it. Let us be honest; every kitchen needs a mandoline. If you love uniformity and speed when shredding, grating, or slicing, have a mandoline at hand.
These tools are tremendously versatile and will cut your food preparation time down to a minimum. They can turn your ordinary carrot to perfect silky ribbons for your salad and your fresh ginger into the perfect, thinnest slices.
If you have a mandoline at hand, you only need a knife to finish the slices of ginger that are too small to put safely through the mandoline. The Mueller Austria Premium Quality V-Pro multi-blade adjustable mandoline is a perfect example of an exemplary kitchen aid.
It will last a lifetime, complete with 420-grade hardened stainless steel blades. You can use its five German-engineered blades for julienne, slicing, and grating.
Pro Tip
Using a mandoline can be very intimidating. The chance of having your finger nicked is very high if you do not observe precautions. First, use a food holder or slicing guard when slicing your food. It will hold all your ginger in place while protecting your fingers.
Unfortunately, most slicing guards are a tad bulky, so they will leave a huge chunk of your ginger shoots unsliced. The temptation to slice your ginger barehanded could overwhelm you. What to do? Have some cut-resistant gloves at hand.
To keep your mandoline stable and prevent slippage, set it inside a sturdy glass or ceramic container when slicing.
Sterilize Your Containers
Clean and sterile jars are paramount for the long life and success of your pickled ginger. The sterilization process will eliminate any fungi, bacteria, and yeasts from the jars to protect your precious sushi ginger.
Lack of sterilization will infect your food with these naturally occurring microorganisms, leading to your condiment’s early spoilage. Fortunately, sterilizing pickle containers is very easy and fast. You can, for instance:
- Heat your oven to 275 °F (130 °C). Line your oven shelves with newspaper, then arrange your glass jars on them. Keep a distance between your jars, close the oven door, and leave them in here for 20 minutes. Use your oven mitts to pull your hot jars out and place them on a heated pad or heat-proof mat. When adding in your pickled ginger, ensure that it is as hot as the sterilized jar to keep the glass jar from shattering.
- Alternatively, sterilize your jars using a dishwasher machine’s steam or high-temperature setting. Place your jars into the machine and rinse-wash them. Take them out of the machine when your Gari is ready for preservation. Observe the temperature rule above when pouring in your pickled ginger to keep your glass jars intact.
- Your microwave machine can also sterilize your non-metallic lid jars. Simply microwave them for half a minute, and they are good to go.
Make Your Japanese Pickled Ginger
With your freshly sliced ginger at hand, now you are all set to make some sweet thin strips of Gari for your home use. The process below will make enough pickled ginger for 16 servings. Set aside two hours of your time to complete the pickling process.
Ingredients
- Ten ounces (283 grams) of young ginger
- 3/4 cups of organic sugar
- 1 cup of plain rice vinegar
- 1 1/2 tablespoons of kosher salt
- 1/4 cup of water
Directions
- Place your fresh slices of baby ginger into your sterilized glass jars. Leave about 1/2 an inch (1.27 cm) of headspace between the slices of ginger and the top of the jar. Press down the ginger into the jar using a blunt knife to eliminate any air bubbles.
- Combine the sugar and vinegar in a bowl and mix both ingredients to dissolve your sugar. If you do not have rice vinegar, use any cider vinegar. However, you will need to experiment with different kinds of vinegar to find one whose taste best tingles your palate on pickling.
- Add the sugar, salt, rice vinegar, and water into a small saucepan. Bring the mixture to a boil. Stir it a few times to ensure that the sugar dissolves. Take the saucepan with the mixture from the fire. Pour into the jar that holds your ginger slices.
- Using a spoon or chopstick, submerge all your ginger slices into the briny liquid. Let the content of the jar cool. Do not cover the jar with its lid while it is still hot. After it has cooled down, cap the jar, then refrigerate it.
- Leave the pickled ginger in your refrigerator for a minimum of two hours before consumption. If your ginger was young and tender, it would gain a great taste within that short time.
- For the best flavor profile, let the contents of the jar rest in the fridge for two or three days. You can keep the sushi ginger in your refrigerator safely for six months. The longer the pickling period, the better the Gari’s taste and texture.
- Keep your sushi ginger in the fridge after opening the jar’s lid to prevent any spoilage.
The Many Benefits of Pickled Ginger
Most Japanese Gari lovers say that they find the taste of pickled ginger so appealing that they eat it as a vegetable to the horror of many polite Japanese. The island country folk use their pickled ginger as a condiment. You cannot have sushi or sashimi here without a serving of amazu shoga. Pickled foods have many health benefits:
- They encourage the growth of diverse good bacteria in the gut. This process regulates gut function, boosts immunity, and reduces inflammation. Eat pickled foods and help your body to better absorb nutrition from the food that you eat. Ginger is a superfood. It has many health benefits in its natural state.
- It reduces nausea, stimulates circulation, and has anti-inflammatory agents. The gingerol in this rhizome has been at the center of ginger’s wide use in alternative medicine for over 2000 years. Gingerol aids the body’s fight against the common cold and flu and aids digestion. This natural oil has a powerful standout flavor, fragrance, and powerful antioxidant effects as well.
- Pickled ginger will refresh and clean your mouth after a meal. The Japanese serve it alongside sushi to ensure that they can taste each sushi roll’s unique flavor. Besides its palate cleanser benefits, ginger is also a natural antiseptic that ensures clean breath.
- Gari makes it easy for you to access all the goodness of ginger in a jar. You can store your pickled jar for ages in your fridge, eliminating any chances of you running out of your favorite condiment.
How to Enjoy Your Pickled Ginger
- Have an extra platter of it for your sushi home delivery order. Pickled ginger is the ultimate stomach-settling end to a delicious meal. Have it before your dessert.
- Blend it into your run off the mill sauces and dressings for some oomph. It will add its tangy sweetness and crunchy texture to your store-bought condiments.
- Add your amazu shoga to your sandwiches and salads. Use it alongside turkey, chicken, and roast beef fillings in sandwiches. You can also toss a few shredded slices of it into your chicken or tuna salad.
- Alternatively, mix it with sesame oil and soy sauce to create a yummy salad dressing.
- Blend some pickled ginger with miso or soy sauce and use it to marinate your beef, chicken, or beef cuts before roasting.
Conclusion
There you have it, a straightforward process of making great tasting pickled ginger. This Gari recipe is so good that you will most likely start to eat your ginger slices straight from your jar. The pickled ginger that you make from this recipe will give you that heavenly knock-you-back spicy flavor.
It will go along well with just about any meal. Best of all, pickled ginger is good for your heart and gut. Get some young ginger and get started on your pickled ginger stash today.
Here’s a quick recap of the process of making tasty pickled ginger:
- Gather a good amount of fresh ginger and all the other ingredients.
- Clean and cut the ginger into thin slices.
- Get storage containers for your pickled ginger.
- Clean and sterilize the containers.
- Soak the ginger slices in the vinegar solution for a couple of days.
Sources
- Just One Cookbook: Gari – Pickled Sushi Ginger
- Cook Like Asian: How To Make Gari – Japanese Pickled Ginger
- Food and Wine: The Science of Vinegar Pickling, Explained
- Tasting Table: Why Everyone Needs a Mandoline in Their Kitchen
- Taste of Home: Are You Making This Dangerous Mistake With Your Mandoline Slicer?
- Thekitchn: How To Pickle Ginger
- The Spruce Eats: 3 Trusted Ways to Sterilize Jars for Jams and Preserves
- Healthline: 11 Proven Health Benefits of Ginger
- Everything Ginger: Health Benefits of Pickled Ginger